GeoGebra Lab 1
If you have never used a dynamic software program before, you should be aware of the difference between properties and objects that are “constructed” rather than “drawn” freehand with a tool. To observe this difference, complete the following activity:
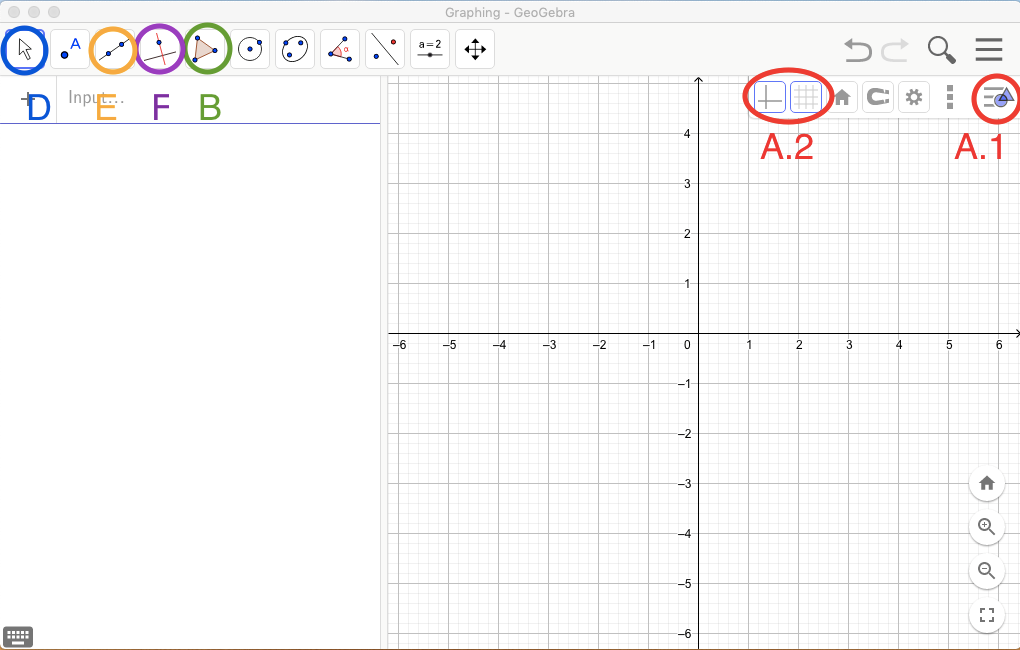
In the diagram below you will see that the window is divided into two parts: the Algebra View on the left and the Graphics View on the right. Click on the “hamburger menu” icon labelled A.1 to see settings for the Graphics View. Click the axes icon (A.2) to turn the axes off. Then click on the grid icon (A.2) and select the blank grid to hide the grid.

- Click on the polygon tool labelled B.
- You are going to draw a triangle that looks right by doing the following: click somewhere on the drawing space (Graphics View) to start drawing the triangle, then click three more times (two more points) to draw a triangle that looks like a right triangle, finishing it by clicking on the first point you placed.
- Click on the selection tool (labelled D in the diagram above) and click on any endpoint of a segment and move the triangle around. You will notice that the triangle changes and is no longer a right triangle. You can undo, if you like, by pressing the arrow at the top right of the screen. You can also press CTRL-z (on a PC) or CTRL-z (on a Mac) to undo.
- Now you will construct a right triangle. Hover over the line button (marked E) or click on it to expand the line options. Choose the tool called “Segment.” Click once for each endpoint of the segment that you want to create.
- Choose the Perpendicular Line tool, (labelled F). Click on an endpoint of the segment and then click on the segment itself.
- Place a point on the perpendicular line using the Point tool (pictured below). Make sure that the point is snapped onto the line. The point will snap when your cursor changes from an arrow to a hand.

- Choose the Polygon tool and connect your three points, clicking on each point, and making sure to again click the first point you choose at the end.
- At the left-side of your screen you have a list of what is on your Graphics View. This section of your screen is called the Algebra View. Find the equation of the perpendicular line – it will have y in it. Click on the circle to the left of the equation to hide the line. Bonus: Right-click the equation and you can turn it from Standard Form to Slope Intercept Form (\(y = mx + b\) form).
- Drag the vertices of this right triangle. How is this right triangle different from the one you drew in part C?